8 hours
I was thinking of packing everything up after the canopy was done, but I still have a few weeks before I need to move the plane so I thought I'd see if I could get the stabilators mounted first. That way I wouldn't have to worry about packing them up separately.
Anyway, I began by trying to test fit one of the stabilators in place between the back of the turtledeck and the tail post. I quickly realized that the notches I cut out way back when I first started on the turtledeck were not in the right place.
The two notches near the center were supposed to be at the outer edges to accept the end of the stabilator spar. Not too big of a deal, I just cut new notches, and I made them a little deeper than what the plans specified for clearance. With that done, I was able to get both stabilators in place.
Then I pilot drilled the aft spars to the tail post.
I also had to trim the lower stabilator skins slightly to clear the sides of the fuselage. The part I trimmed looked like this (the purple sharpie line):
Next I worked on fitting the attach angles to the forward spars. I got everything positioned and then pilot drilled both angles.
I updrilled all the holes to 1/8", but I couldn't get a straight enough shot at them to updrill all the way to 3/16", so I did the final updrilling off the plane to make sure the holes were straight.
I didn't have any clecos long enough to hold the mounting blocks to the angles during updrilling, so I took the lower attach angle and clamped the blocks to it, then drilled the holes straight to the final size on the drill press.
I did one more test fit, and also updrilled all the holes on the back side.
Then I took everything apart again for the last time to deburr all the parts. This is why the plans told me not to rivet one side of the stabilator way back when I built it; I was able to lift the skin up on the top side and deburr the inner surface of the aft spar.
In order to install the bolts, I was just barely able to place them in the holes in each forward spar and then squeeze the heads past the turtledeck skin. The challenging part was getting a wrench between the last turtledeck former and the spars to hold each bolt!
After much contorting of fingers, I finally got all 14 fasteners tightened.
All that was left then was to rivet the aft spars to the tail post, and install all the rivets in the upper stabilator skins, and the tail was installed!
Showing posts with label Stabilators. Show all posts
Wednesday, April 24, 2019
Monday, August 24, 2015
Sunday, August 23, 2015
LH Stabilator Skin Part 2 (3)
3 hours
Same process as on the RH stabilator! I updrilled all the holes, disassembled, and cleaned everything up.
One of the lines of holes on the top surface didn't quite line up with the rib below it though. You can see the line of holes run off the right edge of the rib in the picture below.
My solution is to just add a few extra rivets between the original holes (the left line of holes above). It's not the prettiest looking thing but it will work!
All that's left is to rivet this skin on and then I'll start on the ruddervators.
Same process as on the RH stabilator! I updrilled all the holes, disassembled, and cleaned everything up.
One of the lines of holes on the top surface didn't quite line up with the rib below it though. You can see the line of holes run off the right edge of the rib in the picture below.
My solution is to just add a few extra rivets between the original holes (the left line of holes above). It's not the prettiest looking thing but it will work!
All that's left is to rivet this skin on and then I'll start on the ruddervators.
Saturday, August 22, 2015
LH Stabilator Skin Part 1 (2)
2 hours
Same as the RH side... I got the skin on, closed up, and drilled to #40. Next I will attach the ruddervator hinge, updrill everything, deburr, etc.
RH Stabilator Skin Part 3 (3.5)
3.5 hours
Today I finished updrilling the whole skin. Then I took everything apart and deburred and cleaned up the structure, hinge, and skin. Then I put it back together and started riveting!
One minor issue I noticed was the corners of the leading edge ribs were really pushing forward on the inside of the leading edge of the skin. Maybe this is why it was such a tight fit! You can see in the pictures where the skin is being poked a bit from the inside.
While I had everything apart I filed the corners of these ribs down just a bit to round them off more. I think it helped relieve some of the tension as the skin went back on a lot easier the final time. When I start on the LH stabilator I will do this mod first!
Here's the what the leading edge rib looks like in stock form:
Here's how I filed the corners down:
Anyway, once everything was cleaned up, I cleco'ed the skin back on for the last time and started pulling rivets.
The plans say to not rivet part of the underside of the aft spar, and most of the top surface aft of the leading edge row, so I left those areas cleco'ed for now. I also left the tip rib cleco'ed until I get the fiberglass tip fit, just to leave myself some slop to work with on that end.
So here's how it sits for now:
Today I finished updrilling the whole skin. Then I took everything apart and deburred and cleaned up the structure, hinge, and skin. Then I put it back together and started riveting!
One minor issue I noticed was the corners of the leading edge ribs were really pushing forward on the inside of the leading edge of the skin. Maybe this is why it was such a tight fit! You can see in the pictures where the skin is being poked a bit from the inside.
While I had everything apart I filed the corners of these ribs down just a bit to round them off more. I think it helped relieve some of the tension as the skin went back on a lot easier the final time. When I start on the LH stabilator I will do this mod first!
Here's the what the leading edge rib looks like in stock form:
Here's how I filed the corners down:
Anyway, once everything was cleaned up, I cleco'ed the skin back on for the last time and started pulling rivets.
The plans say to not rivet part of the underside of the aft spar, and most of the top surface aft of the leading edge row, so I left those areas cleco'ed for now. I also left the tip rib cleco'ed until I get the fiberglass tip fit, just to leave myself some slop to work with on that end.
So here's how it sits for now:
Thursday, August 20, 2015
RH Stabilator Skin Part 2 (2)
2 hours
Not too exciting, just more work on drilling the skin to the internal structure!
I decided that before I got too much further I should also drill the ruddervator hinge to the upper flange of the aft spar. Even after pilot drilling and cleco'ing the whole top surface the skin was still under a lot of tension, so I just opened the top of the skin back up and drilled the hinge to the spar alone. That way I didn't have to worry about the whole stackup staying lined up. I drilled every other hole in the hinge, and then closed the skin back up. It was still a tight fit, but having the holes all drilled made it a lot more manageable to close up. Once I got a few clecos installed it was easy to get the whole skin attached again.
Now all that's left is to finish updrilling the bottom and then I can take everything apart and deburr all the holes.
Not too exciting, just more work on drilling the skin to the internal structure!
I decided that before I got too much further I should also drill the ruddervator hinge to the upper flange of the aft spar. Even after pilot drilling and cleco'ing the whole top surface the skin was still under a lot of tension, so I just opened the top of the skin back up and drilled the hinge to the spar alone. That way I didn't have to worry about the whole stackup staying lined up. I drilled every other hole in the hinge, and then closed the skin back up. It was still a tight fit, but having the holes all drilled made it a lot more manageable to close up. Once I got a few clecos installed it was easy to get the whole skin attached again.
Now all that's left is to finish updrilling the bottom and then I can take everything apart and deburr all the holes.
Wednesday, August 19, 2015
RH Stabilator Skin Part 1 (2)
2 hours
Today I started installing the RH stabilator skin. I began by clamping the skin to the structure and double checking my measurements several times. Then I drilled and cleco'ed the bottom of the skin on. This was easy and went pretty quick!
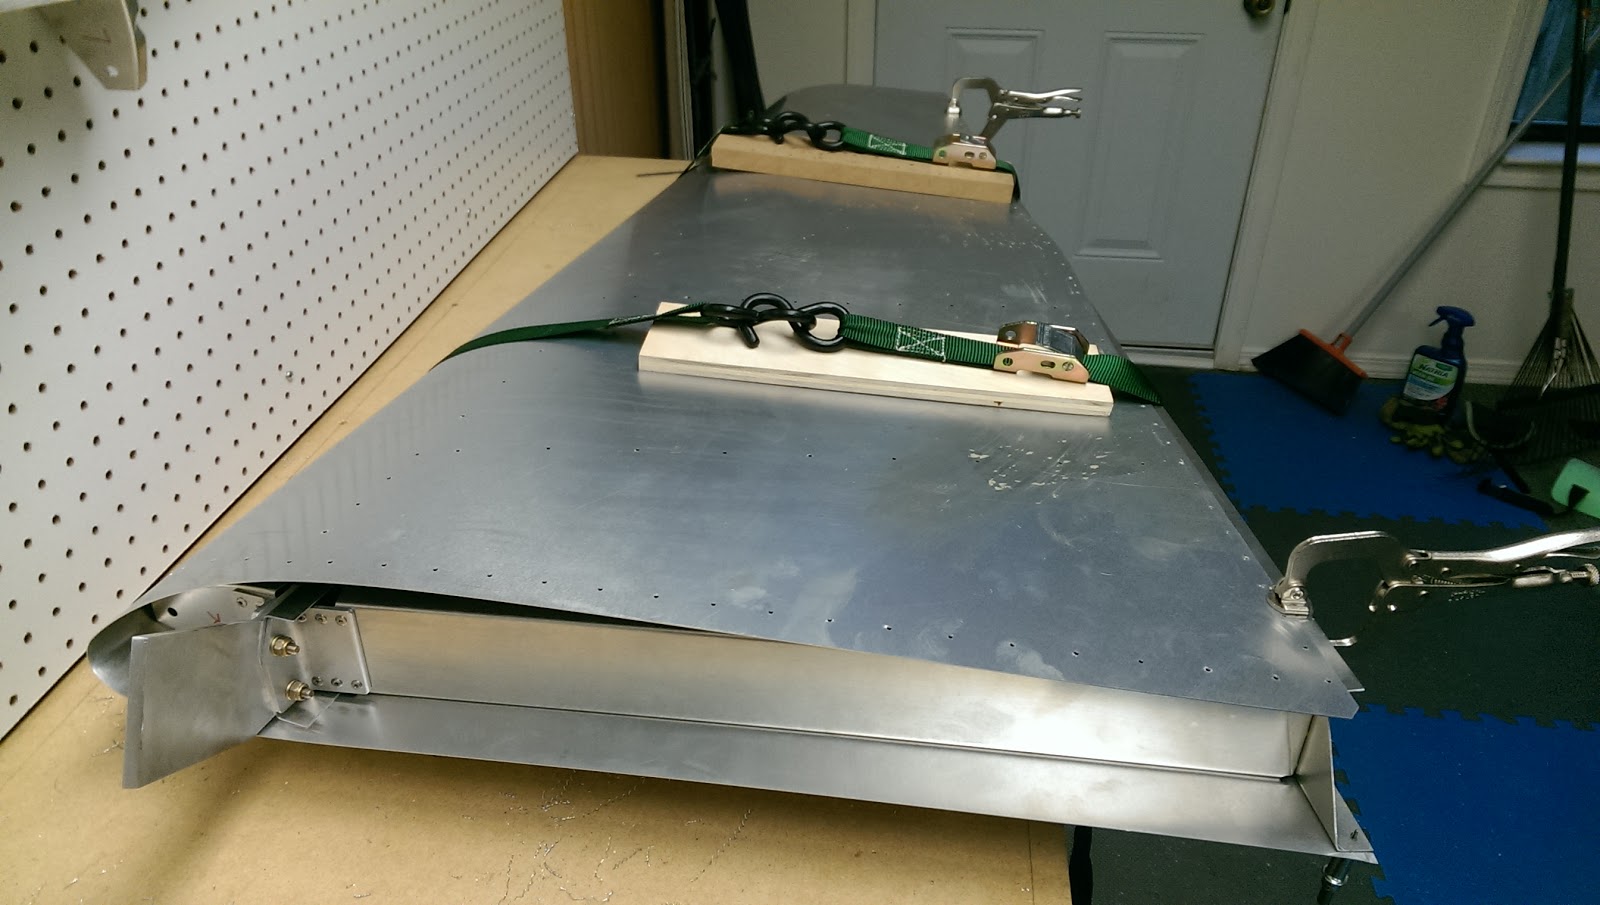
Next I flipped the assembly over and tried to fold the top of the skin down to the structure. This was harder than I thought it would be! I tried pulling it down by hand and clamping it and that was hopeless. Then I grabbed a pair of tie down straps from the garage, and that got the trailing edge of the skin within less than an inch of where it needed to be, but that was it.
After scratching my head a bit, I remembered seeing some other builders using 2x4's to flatten the skin against the ribs. I went back to the garage and grabbed some scrap wood and two big ratchet straps.
This got the trailing edge real close but I still didn't have enough arms to hold it by myself!
Eventually I got my wife to help me. I tightened down the straps and pulled the skin toward the trailing edge as hard as I could while she clamped the skin to the aft spar. I was able to get the tip end aligned just right so I drilled one hole and put a cleco in it, and then we worked our way to the root of the stabilator. It ended up not quite 100% perfect, but the trailing edge of the skin is within about 1/32" of the trailing edge of the spar (about a third of what is shown in the picture above). I think it will be good enough!
I drilled the trailing edge of the bottom skin and started working my way forward until I ran out of silver clecos, and then I called it a night. It finally actually looks like part of an airplane!
Today I started installing the RH stabilator skin. I began by clamping the skin to the structure and double checking my measurements several times. Then I drilled and cleco'ed the bottom of the skin on. This was easy and went pretty quick!
Next I flipped the assembly over and tried to fold the top of the skin down to the structure. This was harder than I thought it would be! I tried pulling it down by hand and clamping it and that was hopeless. Then I grabbed a pair of tie down straps from the garage, and that got the trailing edge of the skin within less than an inch of where it needed to be, but that was it.
After scratching my head a bit, I remembered seeing some other builders using 2x4's to flatten the skin against the ribs. I went back to the garage and grabbed some scrap wood and two big ratchet straps.
This got the trailing edge real close but I still didn't have enough arms to hold it by myself!
Eventually I got my wife to help me. I tightened down the straps and pulled the skin toward the trailing edge as hard as I could while she clamped the skin to the aft spar. I was able to get the tip end aligned just right so I drilled one hole and put a cleco in it, and then we worked our way to the root of the stabilator. It ended up not quite 100% perfect, but the trailing edge of the skin is within about 1/32" of the trailing edge of the spar (about a third of what is shown in the picture above). I think it will be good enough!
I drilled the trailing edge of the bottom skin and started working my way forward until I ran out of silver clecos, and then I called it a night. It finally actually looks like part of an airplane!
Tuesday, August 18, 2015
More Stabilator Parts (1)
1 hour
I didn't have a whole lot of time to work today, but I started on the next page of parts for the stabilators. The two angle pieces came in the kit, the ribs only needed a flange cut off, and the hinges just needed to be cut to length. Pretty easy.
I marked up the fiberglass tips for trimming, but I might wait to actually cut them until I can see how they will fit with the stabilators and ruddervators.
I didn't have a whole lot of time to work today, but I started on the next page of parts for the stabilators. The two angle pieces came in the kit, the ribs only needed a flange cut off, and the hinges just needed to be cut to length. Pretty easy.
I marked up the fiberglass tips for trimming, but I might wait to actually cut them until I can see how they will fit with the stabilators and ruddervators.
Monday, August 17, 2015
Stabilator Structures Finishing Touches (1)
1 hour
After a quick email exchange with Sonex tech support, I have learned that mandrels breaking off outside of the rivets is a common symptom of slightly-too-large holes. Since I drilled all my holes up to #30 and then dimpled them, the resulting hole ends up being a tiny bit larger than a normal #30 hole. So the lesson learned is for flush rivets, drill the holes up to #31 and then dimple them for a tighter fit!
So anyway, today I fixed all the messed up flush rivets that I pulled over the weekend, which was several of them. I found that on most of them I could tap the mandrel back into the body of the rivet with a small pin punch. On the mandrels that wouldn't budge I used a small sanding drum on my Dremel tool to (carefully) sand the mandrels down to flush with the rest of the surface. A couple rivets were hopeless so I just drilled them out and replaced them. This was a tedious process but now I know how I'll drill my holes for flush rivets in the future, plus I got fairly comfortable drilling rivets out without trashing the holes and I'm sure that skill will come in handy plenty of times in the future.
With that task complete, these stabilator structures are done!
After a quick email exchange with Sonex tech support, I have learned that mandrels breaking off outside of the rivets is a common symptom of slightly-too-large holes. Since I drilled all my holes up to #30 and then dimpled them, the resulting hole ends up being a tiny bit larger than a normal #30 hole. So the lesson learned is for flush rivets, drill the holes up to #31 and then dimple them for a tighter fit!
So anyway, today I fixed all the messed up flush rivets that I pulled over the weekend, which was several of them. I found that on most of them I could tap the mandrel back into the body of the rivet with a small pin punch. On the mandrels that wouldn't budge I used a small sanding drum on my Dremel tool to (carefully) sand the mandrels down to flush with the rest of the surface. A couple rivets were hopeless so I just drilled them out and replaced them. This was a tedious process but now I know how I'll drill my holes for flush rivets in the future, plus I got fairly comfortable drilling rivets out without trashing the holes and I'm sure that skill will come in handy plenty of times in the future.
With that task complete, these stabilator structures are done!
Sunday, August 16, 2015
RH Stabilator Structure Part 2 (2)
2 hours
Today I took the RH stabilator structure and finished updrilling all the holes, deburring, and dimpling where appropriate. Then I riveted the structure together. I found a good way to get at the rivets on the after spar channel, where there isn't much room for the pneumatic rivet gun. At least, it's better than the little ramp spacer I think.
I picked up the cheapest rivet gun from Home Depot ($10), which is a little thinner than my pneumatic gun or my other hand riveter.
Then I took the bench grinder to it and removed a little material from the top to give a bit more clearance.
This thing can now reach those rivets inside the aft spar channel no problem! It makes it a bit easier to make sure I'm pulling the rivets nice and straight too, so they're turning out a little better than the ones I pulled yesterday with my ramp spacer.
However, I'm still having issues with the flush rivet mandrels breaking off outside of the rivets.
This seems to only happen with the flush rivets. I've only had one normal rivet do this so far on the whole project, but almost every flush rivet has come out like this! It doesn't seem to matter if I use my hand riveter or the pneumatic gun either. I'm going to have to figure out a way to grind those mandrels down to make everything flush.
Aside from a handful of mandrels that need grinding on each structure though, both the LH and RH sides are now done!
Today I took the RH stabilator structure and finished updrilling all the holes, deburring, and dimpling where appropriate. Then I riveted the structure together. I found a good way to get at the rivets on the after spar channel, where there isn't much room for the pneumatic rivet gun. At least, it's better than the little ramp spacer I think.
I picked up the cheapest rivet gun from Home Depot ($10), which is a little thinner than my pneumatic gun or my other hand riveter.
Then I took the bench grinder to it and removed a little material from the top to give a bit more clearance.
This thing can now reach those rivets inside the aft spar channel no problem! It makes it a bit easier to make sure I'm pulling the rivets nice and straight too, so they're turning out a little better than the ones I pulled yesterday with my ramp spacer.
However, I'm still having issues with the flush rivet mandrels breaking off outside of the rivets.
This seems to only happen with the flush rivets. I've only had one normal rivet do this so far on the whole project, but almost every flush rivet has come out like this! It doesn't seem to matter if I use my hand riveter or the pneumatic gun either. I'm going to have to figure out a way to grind those mandrels down to make everything flush.
Aside from a handful of mandrels that need grinding on each structure though, both the LH and RH sides are now done!
Saturday, August 15, 2015
LH Stabilator Structure (4.5)
4.5 hours
It's been a busy week so I haven't been able to get much work done until today! My C-130J training has gotten busy again, and I had my first two flights in an actual airplane this week (prior to that it had been all full-motion simulator training, which I got about 150 hours of)! Flying a real airplane again finally is great and the J is awesome!!!
Anyway, back to the Waiex. Today I put together and almost finished the LH stabilator internal structure.
I assembled the structure the same way as the RH side.
Before updrilling the holes to their final size, I drew some lines down the center of each rib and test fit the skin to make sure everything was going to line up reasonably well.
Everything looked pretty good, so I went ahead and updrilled, disassembled, deburred, and dimpled where it was required. This was my first time using the Sonex "Super Simple Dimple Die." It seems to work real well with my pneumatic rivet puller and about 40psi from the compressor.
I did have to modify one half of the die, in order to access the inside of the rib flanges. A few minutes on the bench grinder was all it took. The die only cost about $10 with shipping so no big deal!
With the dimpling complete, I riveted most of the structure together. I did run into some issues with a few of the flush rivets though. Some of the mandrels broke off above the face of the rivet, so I'll have to grind them down. A couple others ended up not quite setting flush with the surface of the part, so I will drill them out and redo them later. One mandrel even pulled all the way through the rivet and trashed my little ramp spacer, so I had to make a new spacer!
So I have a handful of rivets to do over later, but that's all the time I had for today. The LH structure is almost done!
It's been a busy week so I haven't been able to get much work done until today! My C-130J training has gotten busy again, and I had my first two flights in an actual airplane this week (prior to that it had been all full-motion simulator training, which I got about 150 hours of)! Flying a real airplane again finally is great and the J is awesome!!!
Anyway, back to the Waiex. Today I put together and almost finished the LH stabilator internal structure.
I assembled the structure the same way as the RH side.
Before updrilling the holes to their final size, I drew some lines down the center of each rib and test fit the skin to make sure everything was going to line up reasonably well.
Everything looked pretty good, so I went ahead and updrilled, disassembled, deburred, and dimpled where it was required. This was my first time using the Sonex "Super Simple Dimple Die." It seems to work real well with my pneumatic rivet puller and about 40psi from the compressor.
I did have to modify one half of the die, in order to access the inside of the rib flanges. A few minutes on the bench grinder was all it took. The die only cost about $10 with shipping so no big deal!
With the dimpling complete, I riveted most of the structure together. I did run into some issues with a few of the flush rivets though. Some of the mandrels broke off above the face of the rivet, so I'll have to grind them down. A couple others ended up not quite setting flush with the surface of the part, so I will drill them out and redo them later. One mandrel even pulled all the way through the rivet and trashed my little ramp spacer, so I had to make a new spacer!
So I have a handful of rivets to do over later, but that's all the time I had for today. The LH structure is almost done!
Subscribe to:
Posts (Atom)