2 hours
I noticed when I installed the pitch trim system that it didn't give me nearly enough nose-up trim, so now I'm back to try and address that.
I had what I thought was a great and simple solution, and that was to drill a new hole in the stick A-frame part that the forward spring attaches to. I thought that moving the hole up would give the spring more leverage on the stick, which was true.
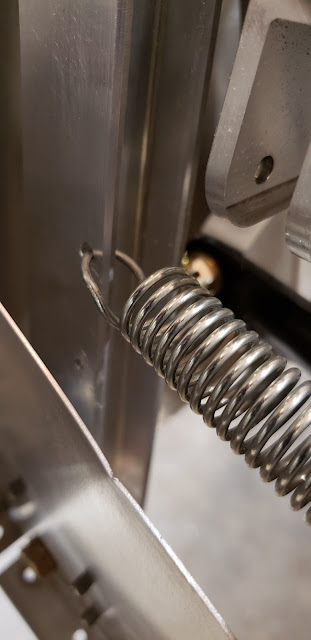
You can see here the new hole I drilled with the spring installed, and the old hole beneath that. This did greatly increase the force of the nose-up trim!
I thought I was done, until later I was goofing around and noticed that with the stick fully aft, the aileron bell crank attached to the stick runs into the spring with it installed in this higher position. This is obviously not acceptable, so I had to move the spring back down and figure out something else.
It was clear I needed to shorten the forward spring to get more tension out of it, but I had a hard time figuring out a good way to trim the spring and bend a new hook on the end without totally mangling the whole spring. I scratched my head over this for a while, and eventually I discovered a method that actually works really well. So here is how to do it.
First, decide how many coils you want to remove from the spring, and jam a small screwdriver through, like this:
Next, run a larger screwdriver through the middle of the spring, and wiggle it around the side of the small screwdriver. This will create a gap between the coils you picked to remove. Now you can grab the coils at the end with a pliers and bend them away, while keeping the rest of the spring straight with the big screwdriver.
Here's what it looks like with the coils bent 90 degrees.
Finally, to remove the extra coils, I carefully ground a little groove into them with the edge of my bench grinder wheel. That created a weak spot, so then I could grab each coil with the pliers and just bend it off.
I removed two or three coils at a time, testing the system between each adjustment. Here's how much I ended up removing!
This made a big improvement, but it seemed like it got to a certain point where continuing to shorten the spring didn't really make much difference anymore. I finally decided to go back to my "extra hole in the stick" idea. I drilled one more hole between the original and the extra hole that I added earlier. I also made sure to install the spring so the main body of the spring was below the hook at the end instead of above. This finally worked. Now I can trim the ruddervators just about all the way full-up on the ground, and the aileron bell crank does not hit the spring at any point. Finally!


No comments:
Post a Comment