Saturday, December 31, 2016

Left Main Spar (3)

3 hours

Cranking away on the left main spar.  Since I already did most of this on the right spar this went pretty fast!  It's just about done, I just need to bolt down the outboard vertical stiffener and tiedown fitting, and rivet the tip rib angle and it'll be all done!

These 8 bolts were still kind of a pain to torque down, but it went faster than the right side did.

The holes on the root rib attach angles don't quite all line up with each other, so I clamped them together and drilled through both using the aft angle as the master.  Then I used the aft angle to transfer the holes to the spar web.  Once the holes were all enlarged to 3/16" they lined up just fine.  On the right side, I tried to do all this with the angles clamped to the spar and it was a pain.  This worked much better!


Root rib attach angles and wing attach block done!

Rear Wing Spars Done (1)

1 hour

Now that I have my hardware I was able to put the last two bolts in each rear wing spar assembly.  I did run into a small problem that I kind of expected, and that was the bolt holes in the root rib attach angles were too close to the radius of the angle for a nut to sit flat.

Not a big deal, I just had to whip up four little blocks with a rounded edge, and use longer bolts.  I'm pretty sure the legacy Sonex/Waiex plans have you do this anyway, but they aren't called out on my B-model drawings.  If you flip to the page where it shows the root ribs attached to the rear spars though, they still show up.

See how the nut can't sit flat because the radius is in the way.

Here's one spacer done.

Another example.  I swapped out the AN3-5A bolts for -7A's to make up for the extra thickness.

Done!

Here's a diagram later in the build process, and you can see the blocks I just built shown here!

Friday, December 30, 2016

Right Main Spar Part 2 (1)

1 hour
Now that I have my hardware I can bolt all these parts to the main spar.  I got the outboard reinforcing angle and tie down fitting done, as well as the 8 bolts holding the inboard bottom edge of the spar web together.

I think until I get the wing attach blocks finalized, that's about all I can do on this side for now!

On the tiedown fitting, the plans call for a washer both on the nut side and the bolt head side.  I found that this resulted in the bolt barely making it all the way through the nut (the closest two nuts in this picture).  So I removed the washer from the bolt head side where required to get the proper amount of protrusion.  Now all of them have about two threads sticking out.

These 8 bolts are very close to the spar cap, so I used a punch and a mallet to tap them in.

Torquing these nuts was even tighter.  The only way I could manage to do it was by holding the nuts with this tiny wrench, and putting the torque wrench on the bolt side.  Luckily the required torque is so low that it wasn't very hard to hang on to the nuts.

Wing Attach Blocks Part 2 (1)

1 hour

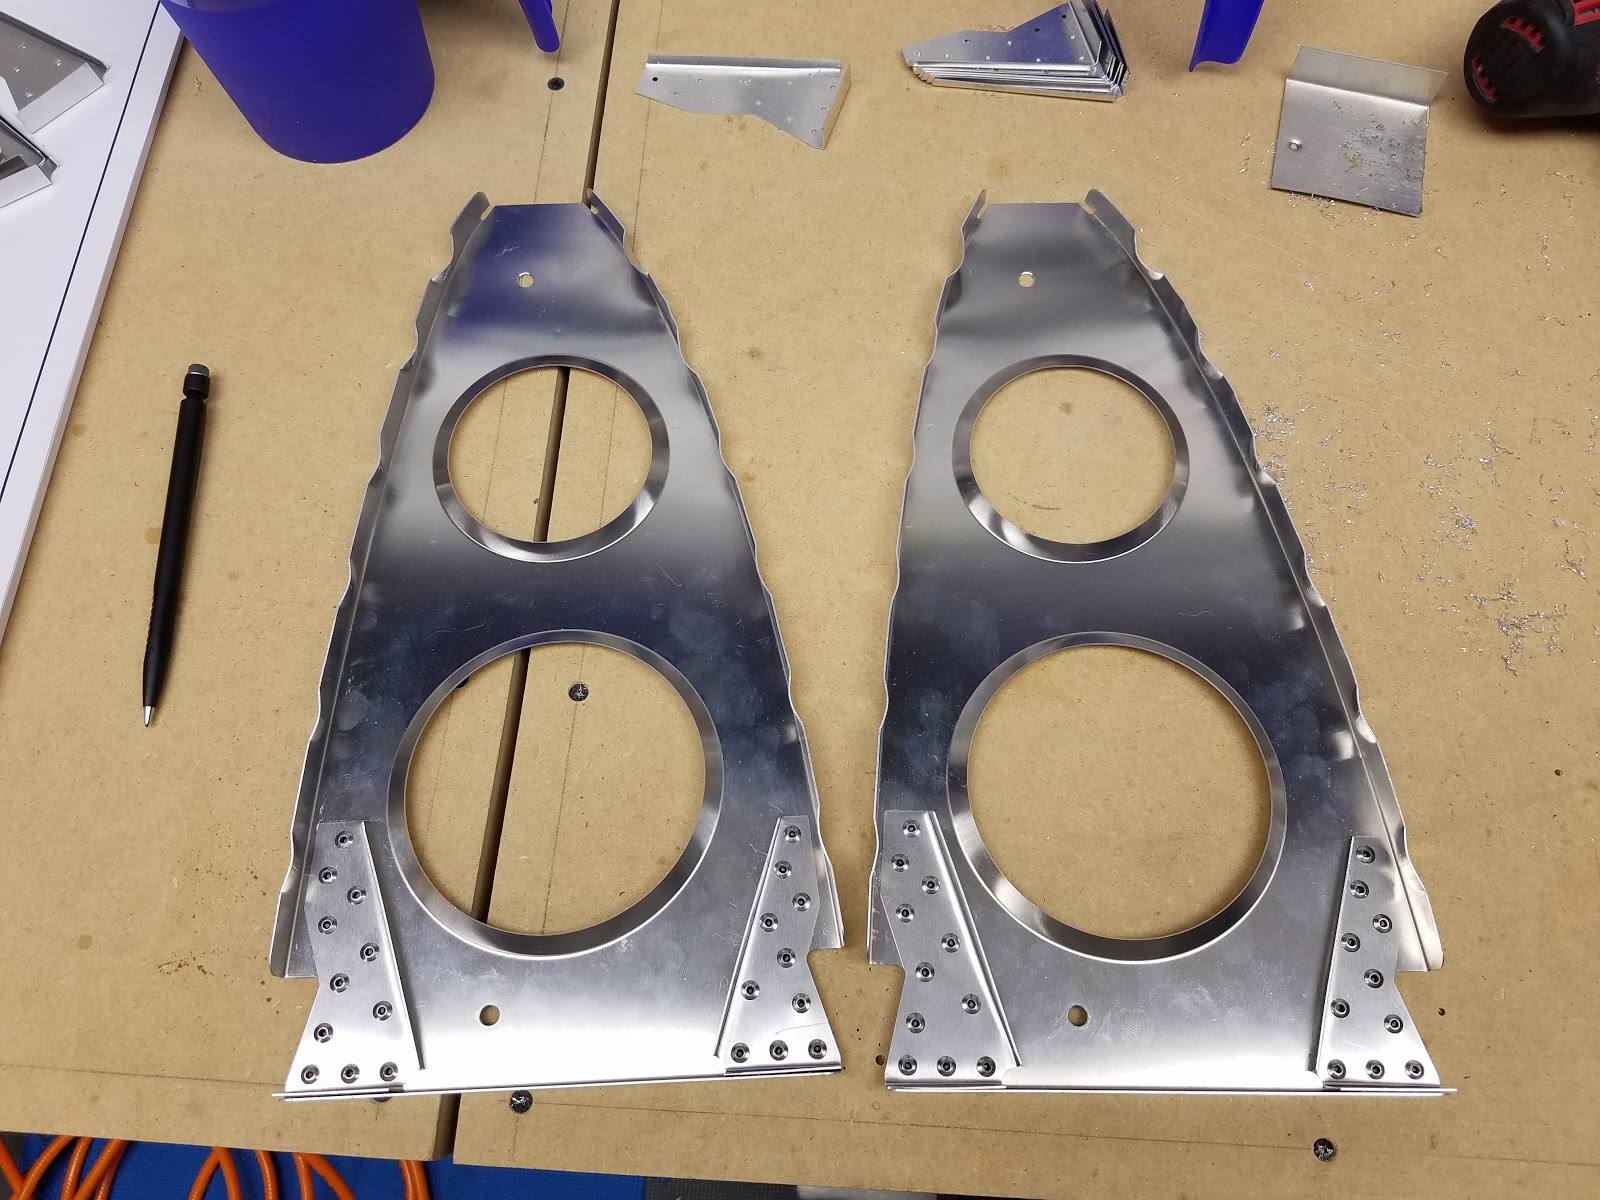
Conveniently, my Aircraft Spruce shipment included a 3/16" reamer, so I used that to finish all 3/16" holes on the wing attach blocks.


I want to use a reamer to drill the 1/2" holes on the right wing blocks, but I don't have one yet.  It's on the way.  In the meantime, I decided to enlarge the holes to 15/32" so they'd be ready for the reamer as soon as I get it.

Once I got up to a 3/8" bit, I determined that it was getting increasingly unsafe to hold the parts on the drill press by hand, so I made a quick trip to Harbor Freight for a sweet $17 drill press vice.  I probably should have bought one a few years ago!  Anyway that made it real easy to step up these two holes to 15/32".  Now I just need my big reamer and I can call these done.


Hardware (1)

1 hour

I got a package in the mail with a bunch of hardware I had ordered from Aircraft Spruce.  It was a lot of stuff so I sat down for a bit and broke it down into zip lock bags for each page of the plans.  I think this will make it go faster later!


Hardware bagged according to what assembly it goes with!

Wing Attach Blocks (1)

1 hour

I figured out to to get my wing attach block to fit in the channel.  I just had to round off the upper corners a tiny bit, and I can now slide it into the spar from the end.

Not much of a picture, but the upper left and upper right corners are what I rounded off a tiny bit to allow this part to fit inside the spar.
 
Next I started updrilling the holes.  I'm going to use a reamer for the final sizes of each so I still have to wait for them to show up in the mail.

Thursday, December 29, 2016

Aft Wing Rib #9's (2)

2 hours

The #9 aft ribs get a bunch of these reinforcing channels as well as the aileron bell cranks.  I got the channels pretty much done.


Right Main Spar (1)

1 hour

I got a little more work done on the main spar, including drilling the root rib attach angles to the spar and riveting the tip rib angle to the end.  I don't think I can do a whole lot more to this thing until I get my hardware, but it should be here any day now!

This wing attach block is supposed to bolt through those holes on the blue line, but it doesn't quite fit between the spar caps.  I think I will have to trim the corner of the block so I can rotate it into place.

Left Rear Wing Spar (1)

1 hour

I came back this afternoon and knocked out the left rear spar.  It went faster than the first one, but I did make one mistake; I attached the root rib attach angle backwards (I made it the same way as the right spar, but it should be the opposite).

I flipped it around but since I drilled the holes backwards, that puts the angle about 3/32" higher than it's supposed to be on the spar.  I think it'll still work since there's more slop than that when you fit the aft root rib, but I emailed Sonex to make sure.  Worst case I'll have to replace that little angle.


Here is what I messed up.  The root rib attach angle on the left spar (bottom one in this picture) is oriented like the right one, but it was supposed to be flipped around so the flat side faces inboard.

With the attach angle flipped around, the holes still line up, but the part is shifted slightly up on the spar (to the left in this picture).  The top edge of the angle is supposed to line up with the top edge of the plate below it, but it's about 3/32" off now.  I'll have to find out if I can get away with this or not.

Right Rear Wing Spar (1.5)

1.5 hours

Right wing spar just about done; all I need is a couple pieces of hardware and it'll be complete!


This doubler plate didn't quite fit into the radius of the spar channel, so I had to round off the bottom edge a bit to make it fit.

Here's the result of my edge rounding.

Also, the hole in the spar channel wasn't quite as big as the hole in the doubler for whatever reason, so I just filed it until they matched.

Done!

Wednesday, December 28, 2016

Rear wing spar parts (1)

1 hour

Now that I have most of the parts what were backordered, I can build the rear wing spars.  I started by cleaning up the edges and drilling the pilot holes on these plates so I can fit them to the spars.
Once I get my hardware that I ordered I should be able to complete the main and rear spars!


Backordered parts (1)

1 hour

I got a box today containing most of the parts that were backordered when I got the kit, so I laid everything out to take inventory.


Tuesday, December 27, 2016

Root rib gussets (0.5)

0.5 hours

I just had a few minutes tonight to sneak into the shops and crank out these last few gussets!  These ones are made of thicker material than the other gussets, so bending the tiny flanges with my little hand seamer was kind of a pain.  But I got em eventually!


Wing Ribs Part 3 (1.5)

1.5 hours

I had a little time this morning to knock out a few more ribs!


Monday, December 26, 2016

Saturday, December 24, 2016

Wing spars and wing ribs (3)

3 hours
I drilled some of the parts to the right main spar, then I made all the little reinforcing gussets for the forward wing ribs.  Then I started riveting them to the forward ribs!


Friday, December 23, 2016

Starting to figure out the wings (2.5)

2.5 hours

Today I spent two and a half hours getting started on the wings, and for more than half of that time I just stared at the plans wrapping my brain around how everything will go together.  The Waiex B-model comes with pre-assembled wing spars, which will save a ton of time.  There are still several parts that I'll need to bolt to the spars, however, before I can start attaching ribs.  The airframe kit doesn't come with hardware, and Sonex isn't selling complete B-model hardware kits yet, so I think I'm just going to order the nuts and bolts that I need to complete this part now so I can get started.  Then I'll order the rest of the hardware later.

Correction!  Sonex just started selling the B-model hardware kits a couple weeks ago.  I'm still going to just order the hardware I need for now though since it's only a few dollars, and the complete hardware kit is over $1300!


Pallet Work Table (1)

1 hour

I took my huge pallet apart, trimmed the OSB sheets down to match the width of my sawhorses (42"), hauled everything down to the shop, and built myself a 10' long table.  Pretty easy!