Friday, August 27, 2021

Wings Installation! (4)

4 hours

I rented another trailer and got some of the boys from work to come help me on a Friday afternoon.  Initially we thought we'd lay the wings flat on the trailer with some padding, but ended up changing our minds and just strapped the whole wing rack on.  Luckily it's only about a 10 minute drive to the airport on city roads so nothing too crazy.


I don't have a specific picture of it, but before we put each wing all the way in, I installed the Van's wing root gasket over the edge of the doubler sheet that I previously had trimmed along the side of the fuselage.  The gasket seems to fit well but made it surprisingly hard to push each wing the last 1/4" or so into position!

We did the left wing first, since the left spar sits in front of the right spar, and I needed to install the main spar pins from the front since the seat blocks access to the rear of the spar tunnel.  I think this contradicts the wing installation instructions somewhat.  The left wing wasn't too hard; we just had to wiggle and push on it quite a bit to get both pins started.

The right wing was a pain.  It was a really tight fit!  I guess that's a good thing though.  It was easy to get it about this close to lining up with the other holes:


That last little bit took a lot of effort though.  I didn't consider this but I should have brought some grease and a mallet for the pins, because there's a lot of friction from the weight of the wings unless they're supported absolutely perfectly, so the pins were hard to push in even when the holes were lined up just right.  We borrowed a small rubber mallet from a hangar neighbor and that helped a lot to tap the pins in.

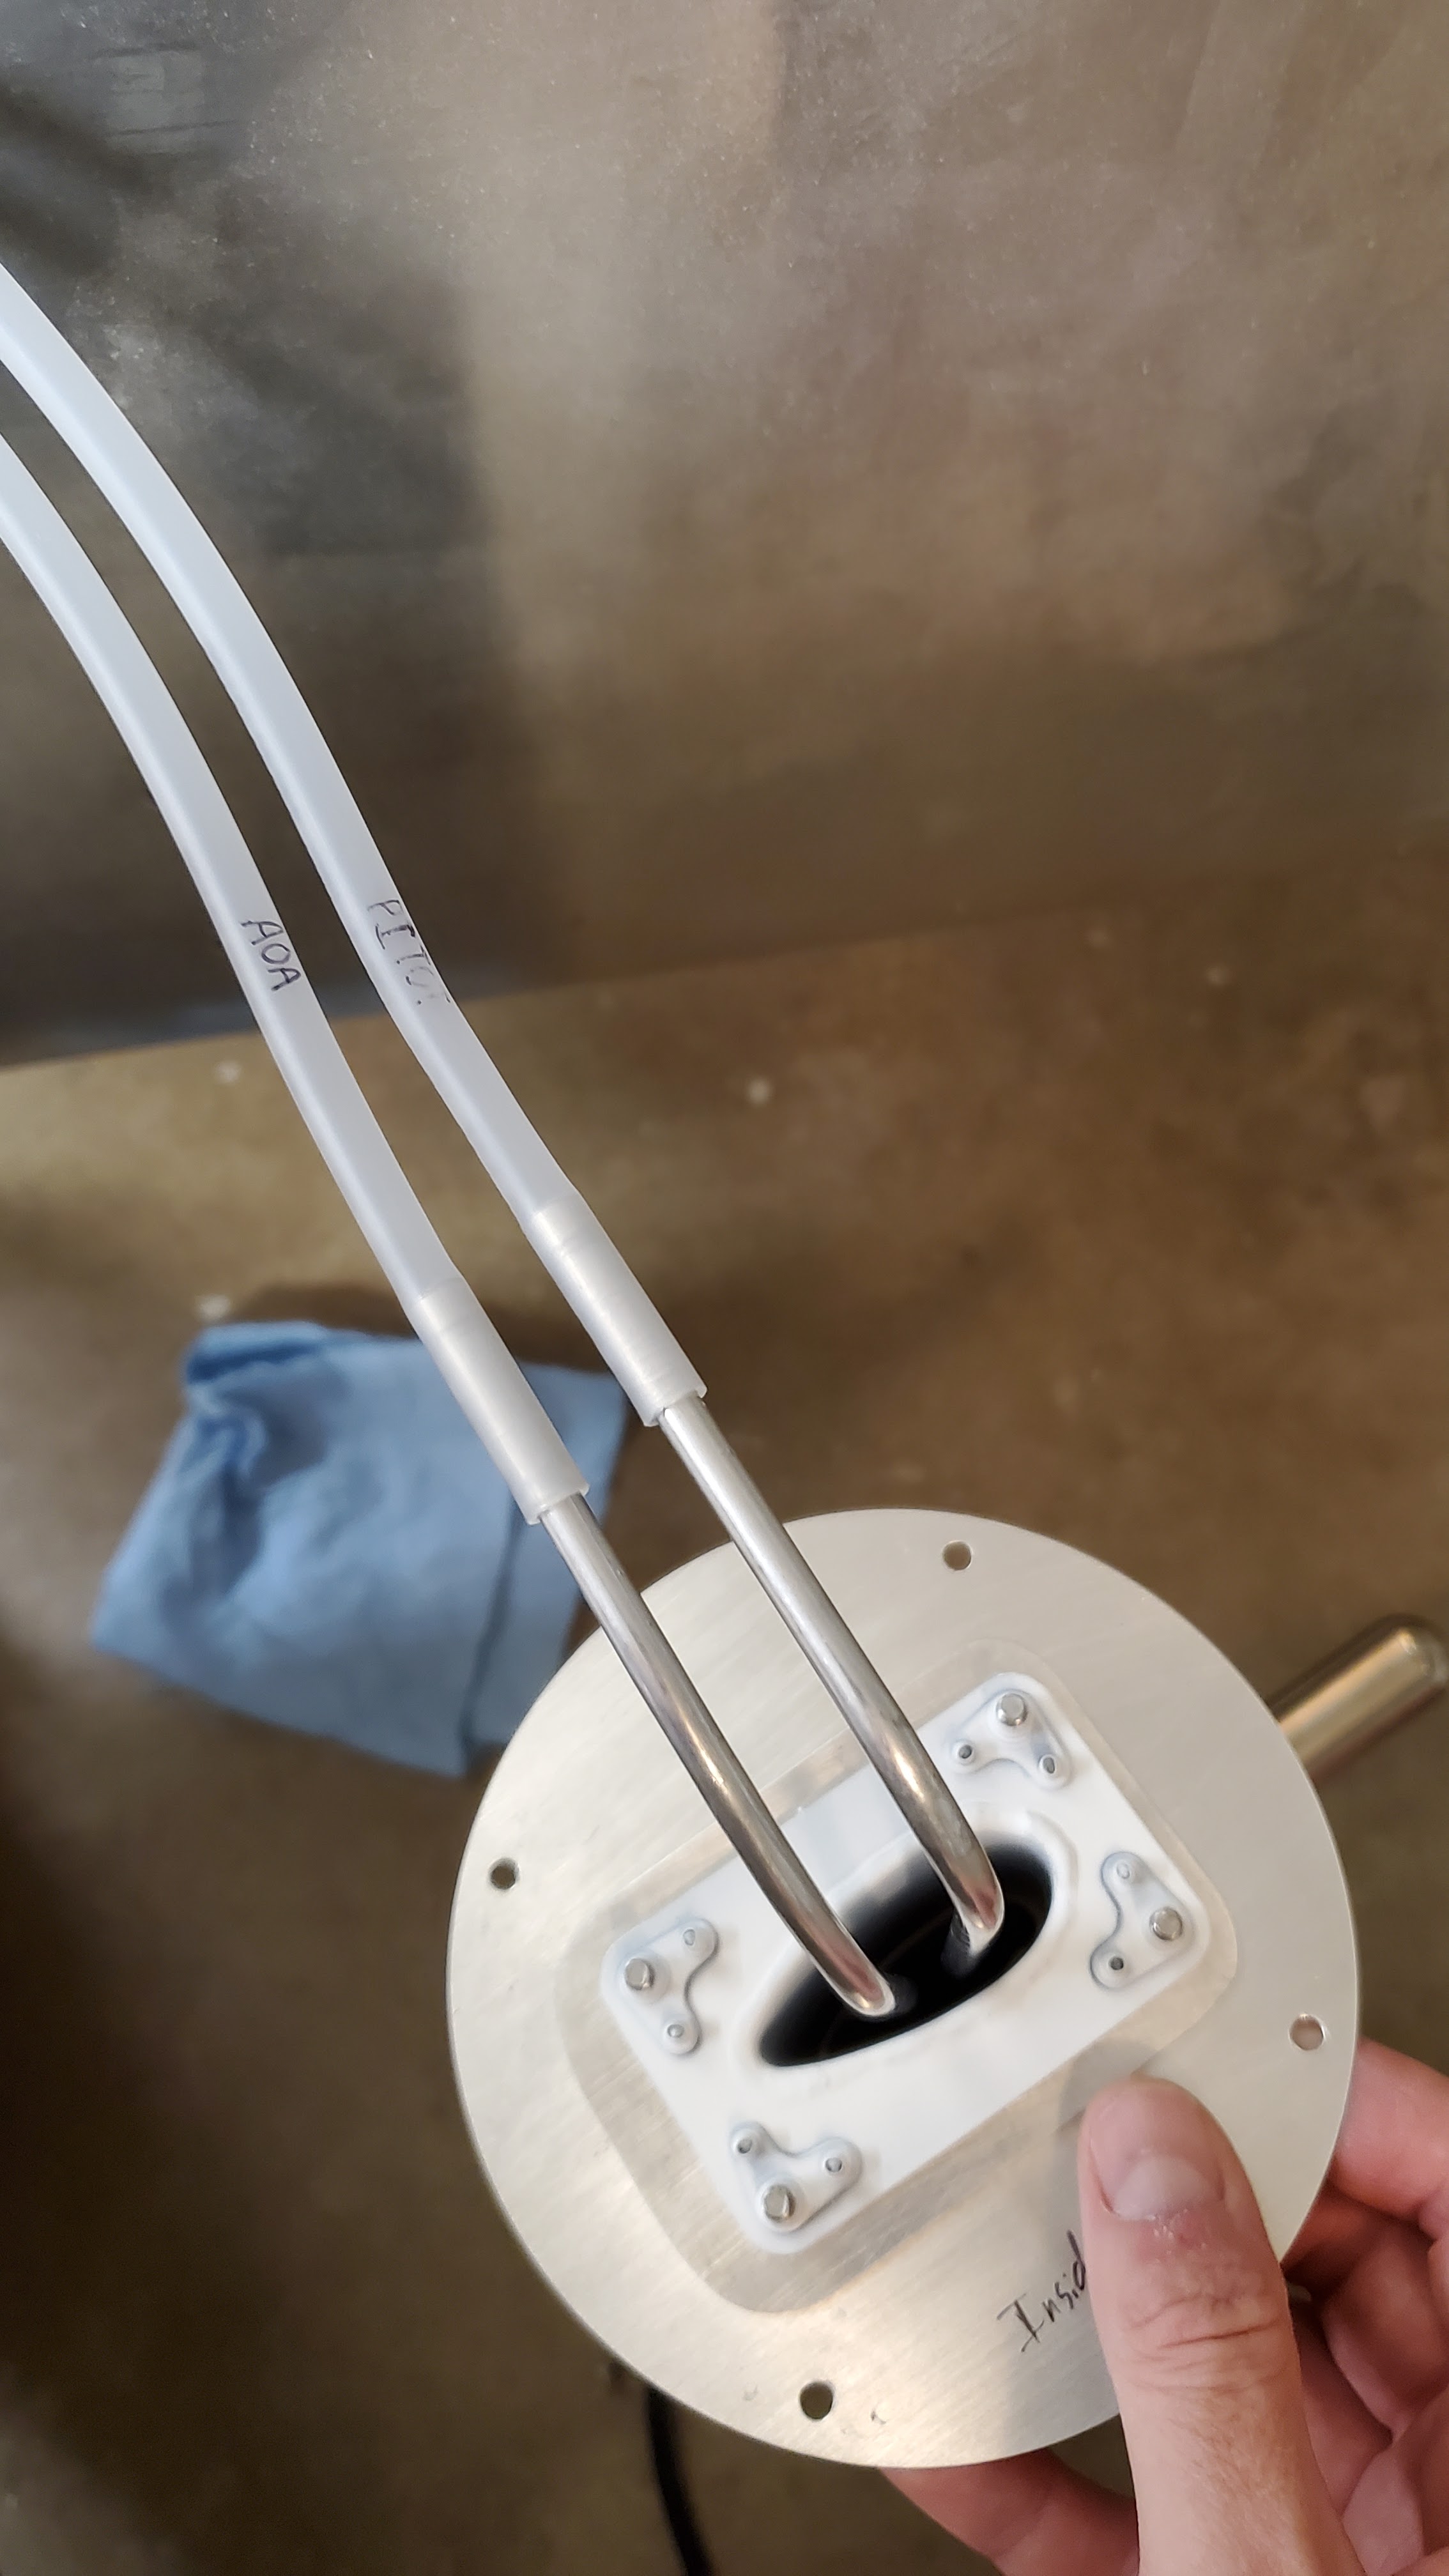
Here is how the connections on the right wing went together.  All the electrical stuff is on that plug, and the pitot and AOA air lines connect to the two bulkhead fittings.  I guess I did a bad job of measuring when I installed the electrical plug on the fuselage, because the plug interfered just a tiny bit with the edge of the big lightening hole in the first rib of the wing.  I just had to file the hole a tiny bit larger and then the wing went in OK from there.  On the left side it's just the electrical plug.


Wings on!!!


Thursday, August 26, 2021

Flaps & Ailerons Installation (3)

 3 hours

This is the last thing I wanted to get done before moving the wings to the airport and putting them on the plane!  It was all pretty simple, I just had to drill the tiny holes through the piano hinges for the little cotter pins that will retain the piano hinge pins.  I installed the long and short aileron pushrods and the associated hardware, and then bolted the little flap pushrods to the flaps.  Now they're ready to go on the plane!


Wednesday, August 25, 2021

Wing Wiring Connectors (2)

2 hours

These are the last wires on the plane!  Before the wings go to the airport and onto the plane hopefully for good, I needed to assemble the connectors at the wing roots to connect the landing lights and wingtip lights to the connectors I had previously attached to the sides of the fuselage.  It took me a minute to remember how these pins and connectors work exactly, but after that it was simple.  I left about a foot of wire sticking out of the wing root so I'd be able to get the wing partially installed, plug in the connector, and then tuck the extra wire into the wing before sliding the wing all the way into place.


I hooked up my little 12v power supply to double check that all the lights work!


Garmin Pitot/AOA Probe (3)

 3 hours

When I built the wings, I planned on using the stock pitot/static probe on the right wing like the plans call for, and then adding a Lift Reserve Indicator probe in the same place on the left wing.  A couple years later, I decided to go with the Garmin avionics, so now I wanted to install the Garmin GAP 26 Pitot/AOA probe.

The GAP 26 was pretty easy to install, I just had to buy one of these generic pitot tube brackets.  I had a spare round inspection panel just like what I mounted the original pitot tube on, so I cut a hole in that to match the mount, and then I was able to bolt everything together.  I used a laser level to make sure the mount was oriented straight ahead in relation to the wing.  I also primed and painted it before final assembly because it was just bare steel.


I don't have a picture of it, but I wanted a cover for the probe so I ordered this one and it fits the GAP 26 perfectly!

Finally, since this probe does both pitot and AOA, I removed all the LRI stuff from the left wing and covered the hole with another round inspection cover.

Sunday, August 22, 2021

Fuel & Magnetometer Calibrations (3)

3 hours

This was only marginally successful.  I spent a bunch of time putting gas in the tank one gallon at a time, trying to calibrate the fuel level probe with the G3X, but by the time I got to 5 gallons added, I realized I missed a step and never recalibrated the probe to zero after I trimmed it.  So I'll have to redo that.

While I had fuel in the tank though, I did do a preliminary fuel flow test.  I didn't have anything to raise the front of the plane with for now, so I just did the test in the normal ground attitude, which is 8.4 degrees nose up.  I disconnected the fuel line at the AeroInjector, put a gas can beneath it, and opened the fuel valve.  The G3X and FT-90 fuel flow transducer indicated around 29 gallons per hour with 5 gallons in the tank, and the flow rate gradually decreased to about 26 gph by the last half-gallon.  It took 11 minutes and 15 seconds to drain the 5 gallons, which averages out to about 27 gph, so the fuel flow sensor appears to be accurate.  The goal is for the fuel system to be able to provide 150% of what the engine would require at full power, so I wanted to see at least 15 gph.  This looks to be way better than that which is great, but I will try to redo the test later with the nose elevated further to make sure it can still meet the required flow rate in a climb attitude.


After that, I dragged the plane out of the hangar and out to and empty taxiway where there weren't any buildings or any other metal objects, and ran the magnetometer test within the G3X setup page.  It tells you to taxi around a compass rose, but I just used the compass on my phone to get the initial bearing and then moved the tail around when it told me to turn.  Eventually it had my gradually turn the plane around 720 degrees to the right, and then the magnetometer was all set.  Just looking at the orientation of the taxiway on the airfield diagram, and my phone compass, it appears to be correct!


Friday, August 20, 2021

Fuselage Move to Airport!

I am pretty much out of tasks to do in the garage on the fuselage, so it's time to take it to the airport!  I rented a trailer and got some dudes from work to help, so it was real easy.


Thursday, August 19, 2021

Fuel Tank Strap Service Bulletin (3)

 3 hours

Sonex put out a service bulletin to replace the single piece fuel tank straps with new two-piece straps that can be adjusted to avoid over-constraining the tank in case it expands slightly over time.

Anyway, I found it pretty easy to replace the aft strap, but the forward strap was not fun!  Pretty much all the wires go right past the two fasteners that I had to remove and replace, and also the ADAHRS box on the right side was in the way.  I struggled with it for quite a while, and finally gave up and got my wife to help me remove the ADAHRS so I could get at it, and then it wasn't too bad.  Still, hanging out crammed in the footwell was not comfortable!


Tuesday, August 17, 2021

Miscellaneous Engine Chores (3)

3 hours

Here's some more stuff I should have done on the engine a while ago but finally got around to.

Anyway I had read something somewhere about an engine having some oil troubles due to a blocked pushrod not allowing oil to flow through it.  When I built the engine I hadn't even realized that oil was supposed to travel through the pushrods, so I had no idea if I had checked that there were all clear before I installed them.  So, out of paranoia I removed each one and made sure there was nothing lodged inside that could block oil.  Sure enough, I found one that was totally blocked up, probably with a chunk of the plastic mallet I had used to hammer the tips on.  I couldn't figure out any way to clear it, so I ended up having to buy some more pushrods so I could cut a new one to replace it.  This time I put the tip in the freezer overnight, and that made it a lot easier to install.  Much less hammering required!

While I had the top end apart, I figured out exactly where TDC was and marked it on the prop hub, so now I can easily figure out where TDC for each cylinder is without taking anything apart.  After that I put the valvetrain back together and adjusted all the valves again.

Next, I found after I first cranked the engine that a decent amount of oil leaked between the bottom of the turbo bearing block and the little sump that attaches to it.  I found with the tail raised, no oil sits there, so I could pull the sump off, clean everything, and reinstall it without making much of a mess.  This time I used the Permatex Aviation Form-a-Gasket that I used on the engine case to seal it, instead of the RTV that the plans called for.  We'll see if it leaks this time!

I also re-checked the clearance between the magnatrons and the trigger magnet on the flywheel, since I had loosened one of the mounting nuts on each one, so I wanted to make sure nothing had moved.

Finally, I put the heat shield back on the turbo, and found that I had to cut a little clearance in the upper left edge for the thermostat.  Now I think the engine is ready to go!


Redid magnetron clearance
Turbo heat shield clearance for t-stat & coolant line

Gear Fairings Fixes (1)

1 hour

I noticed had two adjustments to make on the gear leg fairings and wheel pants.

On the wheel pants, when I fit them I did it with the tail raised so the plane was level.  When I set the tail back on the ground, I couldn't rotate the wheel pants back far enough to clear the axles and brakes before the back edge hit the ground.  So I just had to remove a little more fiberglass so they can be installed and removed with the plane on the ground.

On the gear leg fairings, I realized that the right one blocked the lower cowl hinge pin, so I had to cut a little half circle through it so I'd be able to get the cowl on and off with the gear leg fairings on.


Saturday, August 14, 2021

Hangar!

 I finally have a hangar!  It took two years on the waiting list but I finally got one of the small hangars at KABI, which are owned by the city and leased to the local EAA chapter 471.  It's nothing fancy but it's cheap!  And the timing is pretty much perfect!


I added a bunch of lights


I got this cabinet from a coworker/hangar neighbor, and brought the old garage beer fridge over too


Wednesday, August 11, 2021

Secondary Ignition Static Timing (0.5)

 0.5 hours

I should have done this before I even mounted the engine on the plane but I guess I forgot!

The secondary (coil) ignition has adjustable timing, that you adjust by rotating the little cylinder on the back of the engine.  The cylinder rotates with the flywheel, and it has a magnet embedded on the outside that triggers the upper and lower coils when it passes by.


With the turbo behind the engine, you can't really get a straight look at the trigger to see exactly where it is.  I ended up removing it completely and filing a little mark on the outside edge so I could see where the magnet was pointing from the side.


Here's where the manual says to position the magnet.  Kind of hard to see, but I'm sure it's going to take some adjusting later anyway so whatever.


Here's my best attempt, and the most direct view I could get of the magnet's position by jamming my phone between the turbo and the accessory plate!


Saturday, August 7, 2021

Turbo Coolant Troubleshooting (4)

 4 hours

I needed to revisit the turbo cooling system because the last time I tried to fill it, there was almost no flow from the pump and I couldn't really figure out what the problem was.

Sonex put out a message saying that the thermostat could protrude too far into the "T" fitting on the front of the turbo, which could block some of the coolant flow.  Seemed reasonable to me, so I ordered a new T fitting and a bushing to move the thermostat up from the T somewhat.


Here's the old setup:


I removed the original T fitting, but I found that the thermostat didn't protrude into it at all anyway.


As far as I could tell nothing was blocking any flow at the turbo either.


I installed the new parts anyway since I had them, and at least now the thermostat is a lot easier to access if I ever have to replace it.


I don't think there was any blockage, so the problem must be trapped air in the system somewhere, probably the radiator.  I decided what I needed to do was try filling the coolant again and force the air out somehow.  I went and got a little hand pump for transferring fluid, and I tried disconnecting one of the lines at the radiator and forcibly pumping coolant through, and that forced a lot of air out.  However, I had no real good way to disconnect the pump and reconnect the lines without air getting sucked right back in.

Finally what I ended up doing was just adding a little T at the radiator outlet, to act as a bleed port.  Then I was finally able to fill the system, and the air was able to travel out of the radiator and escape out the top of the T.  When it was full I just clamped a cap on the T.  I had to reroute one of the lines from the T around the right side of the engine mount to get to the coolant pump, but that was it.  I can't really tell for sure if it's finally working properly or not now, so we'll have to see how it cools the turbo once the engine is running!