Monday, May 31, 2021

RPM Sensor (4)

 4 hours

One of the side effects of switching my voltage regulator to that AVC1 was that pulling an RPM reading directly from the alternator was no longer going to be reliable.  I thought this would be some kind of simple fix but it was a little more complicated than I expected!

After researching around a bit I decided the easiest way to get an RPM reading to the G3X would be with a Hall effect sensor that could sense the teeth on the flywheel.  I found this Honeyweel LCZ260 that seemed like it would work.


This would have been way easier to do before the engine was installed on the plane, but there seemed to be room to mount the sensor on the upper left side of the flange at the back of the engine (where the transmission would mate up in a car), just above the starter.  I tried a few different ideas for how to mount it, and ended up just using a simple little piece of angle I had in the scrap pile.


This is looking at the left side of the engine; you can see the little starter gear below.  I just drilled through the aft baffle fence and the flange to mount my little angle there.


Once I had the bracket location figured out, I adjusted the nuts to set the end of the sensor as close to the flywheel teeth as I could (obviously making sure nothing made contact anywhere).  I used a locknut on the lower nut to ensure it won't ever loosen and fall into the flywheel, and I also put loctite on the upper jam nut too for good measure.


I routed the 3-wire lead from the sensor through the firewall with all the other wires, and connected it to the RPM pins on the GEA24 (+12v, ground, and signal).  Then all I had to do was set up the G3X to understand the sensor output.  To calibrate the sensor, you need to tell the G3X how to convert the signal in hertz into RPM.  The flywheel has 88 teeth, so every 88 pulses equal one revolution.  To convert 88 hertz into revolutions per minute you just divide 88 by 60, and that's pretty much it.  


The G3X let me put 8 data points in to form a calibration curve, but it's linear so I don't really think it matters too much.  Anyway once I got that all set up I tested it by just cranking the starter with the spark plugs removed, and it read 250 RPM, same as before.  So I think it works!


Saturday, May 29, 2021

Heated Seats (8)

8 hours

This took way more time and effort than it probably should have!  I ordered the heated leather seats from Sonex, but I wasn't sure what switch they were going to come with.  The best estimate I could come up with was a switch like this, since that's what appeared to be on the factory B-model plane.

I  wanted to finish the panel earlier, so I needed to cut a hole for the switch.  I didn't want to buy the seats yet at that time, so I just ordered one of those switches so I could make the right size hole and make sure everything would fit.  Of course, when I bought the seats, they came with totally different switches, that looked like this.

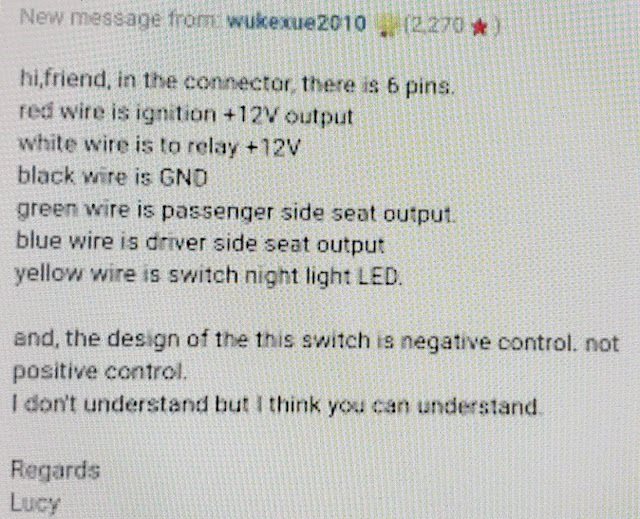
I wanted to use the rectangular switch that I bought, since I already cut the panel for it, so then I had to figure out how to wire the seats to that switch.  I asked the seller, and got some instructions that I thought were pretty confusing at first, but actually made sense in the end:


After some head scratching and experimenting, I figured out this is how I needed to connect it:


I wasn't really totally sure what I was doing, so I hooked everything up to a power supply to test it.  Everything appeared to work!


All I really used from the wiring that came with the seats was the little connectors that hooked up to the heating elements in the seats themselves.  Everything else I just made on my own.  The stock harness didn't strike me as very nice quality anyway.


I mounted the relay to the upper longeron close by, behind the panel:


I ran the wires with the little pre-made connectors to the seat and temporarily zip-tied them in place:


Finally the seats are done!


Monday, May 24, 2021

Canopy Switch (2)

 2 hours

Yet another little project.  I wanted to have a switch somewhere that would detect whether the canopy was closed or not, so the G3X could warn me if I ever tried to take off without it secured.  Initially I had thought of using this type of switch, but I couldn't really figure out where to mount it.  After asking on the Sonex forum, I got a recommendation for this type of switch instead, which was a little easier to work with.  I decided to mount the switch on the upper longeron, just in front of the canopy latch, so that it would only be triggered if the canopy was closed all the way AND the latch was all the way forward.


Once I got it mounted the rest was easy really, I just configured it on the G3X and now it generates a Caution any time the button isn't pressed.  I think it can also be programmed to make an audio alert if I set takeoff power with the canopy open too; I'll figure that out later!


Sunday, May 23, 2021

AVC1 Voltage Regulator (4)

 4 hours

This was another project I got in my head while I was deployed, so here goes.  I read that the stock voltage regulator tends to overheat and fail, and also that lithium batteries like the one I installed seem to work better with a slightly higher charging voltage than the stock regulator puts out.  So, I figured I'd solve both problems by just swapping to one of these:


This regulator, besides appearing likely to dissipate heat a lot better, has adjustable voltage output and integrates the same alternator control and overvoltage protection that I had used a relay and crowbar module for previously.

Anyway, here's the AVC1 compared to the stock one:


Electrically, it was a pretty much drop-in replacement.  The hardest part of installing it was actually just drilling the new holes and installing nutplates with everything else that's already installed on the firewall!

After removing the old regulator and relay, and relocating the filter capactor, I had a few unused holes on the firewall to seal up.  I found these little steel plugs at Home Depot that seemed to work well with a dab of fireproof sealant: https://www.homedepot.com/p/1-4-in-Nickel-Plated-Steel-Hole-Plug-807748/204273764


The only real wiring I had to do was to create this little abomination, that connects the two output terminals on the regulator to the capacitor and the ammeter shunt.


The remaining four terminals are just the two alternator leads, the "alternator off" alert output, and the alternator control wire to the master switch.  Done!


Friday, May 21, 2021

GDL 50 ADSB Receiver (3)

 3 hours

I have the required ADSB-Out on my GTX 35R transponder, but the traffic and weather data you can receive is so useful that I wanted a receiver as well.  I found this Garmin GDL 50 on sale while I was away, which will interface nicely with my G3X stuff, and I can also take it with me when I fly other planes or whatever.

I bought the wiring harness for the GDL too, which allows it to receive power and send data to the G3X.


It came with a little dock, which I mounted on top of the glare shield.


I passed the cord through a grommet, and secured it with an adel clamp.  The power wire had an inline fuse holder, but I cut that off to get everything through the hole, and then reattached it later on the other side.


Here it is in its dock:


Underside view:


Here's the wiring info.  All I needed out of all these wires was power and ground, and one of the RS-232 in/out pairs to connect to the GDU 450 display.


The wires are tiny (26 awg)!  I cut off and secured with heat-shrink the wires I didn't need, then separated the power/ground and directed them one way, leaving the RS-232 wires to proceed in the other direction (to the connector on the back of the G3X display).

I connected the power wire to my "Aux Power" switch on the panel, which will power the GDL, iPad dock, and the USB ports.  I reused the inline fuse holder with it's 3A fuse as well.


Here's the final product!  Once I configured the GDU to look at the RS-232 input, it recognized the GDL right away and added traffic and weather screens to the flight display.


It appears to work!  Traffic spotted a few miles southwest of my house at about 700' AGL.


Thursday, May 20, 2021

Wing Root Connections Part 2 (0.5)

 0.5 hours

This was just a quick re-attack on one of the last things I worked on before I left.  I had just ran out of pins for these CPC connectors, so I wasn't able to finish them back in December.

I crimped the last couple of contacts on, closed up the connectors, tidied up the wires, and the wing root connections were done (at least on the fuselage side, I'll do the wings later)!


Tuesday, May 18, 2021

Fuel Supply Line Changes (2)

 2 hours

I'm back!  Another deployment is in the books and now I'm trying to remember where I left off.  Besides finishing everything that still needs to be done to complete the plane, I have generated a few extra projects while I was gone too.

First one to tackle is the fuel supply line.  After doing some research I realized I should add a fuel filter, so I re-did the line from the tank to the firewall.  I also took the opportunity to move the fuel flow sensor closer to the tank in hopes of making it as accurate as possible, and adjusting the position of the shutoff valve to make it easier to reach from the seat.

The fuel filter is from Jegs (link), and it was the most compact serviceable filter I could find.  I had to shorten my "flexible" line by about an inch with this new setup, so it's not really that flexible anymore, but it's just flexible enough to connect to the firewall bulkhead fitting, so it's good enough I guess.

Here's what the supply line looks like now: